
A Honeypot is a server which attempts to mimic a real device in an attempt to lure malicious actors into hacking it. This provides useful real-life threat data and information into the types of attacks being conducted in the wild.
By making a honeypot similar to a service you provide, the data collected by the honeypot, such as IP addresses, tactics etc, can be used to harden the defenses around the legitimate services you provide.
I will be using the open-source software ‘t-pot’. It allows you to deploy and manage multiple honeypots of different types, while bundling some great pre-configured monitoring tools. This guide covers how to build and configure t-pot on a Raspberry Pi.

Pre-requisites:
- A Raspberry Pi 4 or 5 (Minimum 8GB RAM)
- M.2 NVMe SSD (Recommended) or an SD Card (Minimum 128GB)
- If you’re using an M.2 SSD, you’ll need an M.2 caddy & an M.2 Hat.
Tutorial
Once you have the pre-requisites covered:
Step 1: Install an OS
First, we need to image our Raspberry Pi.
Download the Raspberry Pi imager:
https://downloads.raspberrypi.org/imager/imager_latest.exe
Once downloaded, run the installer and open the application.
Select the following options based on your hardware:
Raspberri Pi Device: The Pi version you are using (4 or 5)
Operating System: Ubuntu Server 24.04 LTS (64-BIT)
Storage: The SD Card/M.2 in caddy.
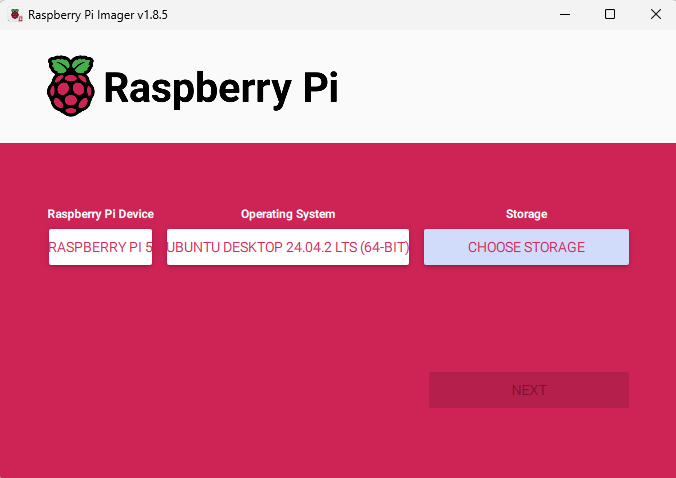
When you select ‘next’, you will be asked if you’d like to pre-apply certain settings. This will allow you to skip the Out-of-Box-Experience (OOBE) and pre-configure username, password and network settings. Most importantly, you can enable SSH.
Next, wait the image to write to the storage device.
Once Ubuntu server has successfully installed, log in, either through SSH or keyboard & mouse, and run the following command to bring the device up to date:
sudo apt update && sudo apt upgrade -yStep 2: Installing T-Pot
To install T-Pot, clone the T-Pot CE Git Repository:
git clone https://github.com/telekom-security/tpotce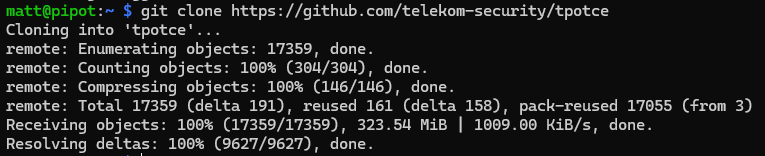
If you do not have git installed, install it with sudo apt install git
Navigate to the newly created directory:
cd tpotceUse the install.sh script to install tpot:
./install.sh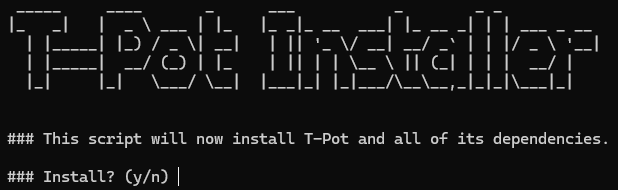
The script will require you to provide information about the server, as well as configure a username and password which will be used later.
Note: Once you run this script, the SSH port will have changed from 22 to 64295, this is to allow SSH honeypots to use that port instead. To SSH to the server from now on, you will need to specify this new port. For example, the PowerShell syntax is this:
ssh <user>@<IP Address> -p 64295Step 3: Creating a custom compose file
By default, T-Pot will have every possible honeypot running when you start the server after installing the software. This is not only very resource intensive , but also pointless. Not only will multiple honeypots be running that you won’t want or need, but some honeypots will be attempting to bind to the same port.
To fix this, we need to customise the docker-compose.yml file. Luckily there is a handy script to help us do this. Navigate to the compose folder:
cd composeRun the customisation script:
python3 customizer.pyThis will take you though all the possible honeypot names and ask if you want to include them. (Some will be required as they form part of the system, such as elasticsearch and kibana)
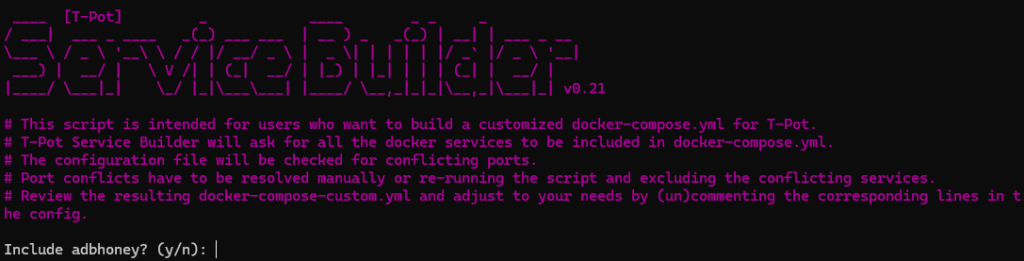
The names will not mean much, however each one is listed in this GitHub repo:
GitHub – telekom-security/tpotce: 🍯 T-Pot – The All In One Multi Honeypot Platform 🐝
Some highlights that I have tested are:
Cowrie – An SSH honeypot that presents attackers with three failed logon attempts to gather credentials, and then provides a fake shell which collects all the commands entered and any downloads performed.
Wordpot – A fake WordPress honeypot which not only provides a false wp-admin logon screen, but also hosts an ‘xmlrpc.php’ file and other wordpress related artifacts.
Step 4: Using the custom file
To use the custom compose file we just made, we need to replace the current file:
mv docker-compose-custom.yml ../docker-compose.ymlThis will move the custom file back one directory, and re-name it to the correct file name as expected by T-Pot.
Now, when you reboot the server, only the containers you selected should be running. You can check which containers are currently running using the docker command dps as I did below:
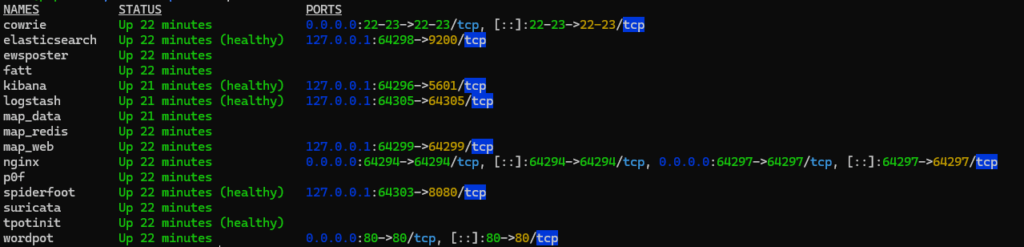
Even though I’m only using cowrie and wordpot, the other containers are all required to provide the dashboards, database, maps and more.
Step 5: Using the web GUI
Access the web GUI by visiting the IP address of your server on port 64297:
https://<IP ADDRESS>:64297This will prompt you to enter the username and password you set during the initial install. Once logged in, a screen will greet you with the following options:
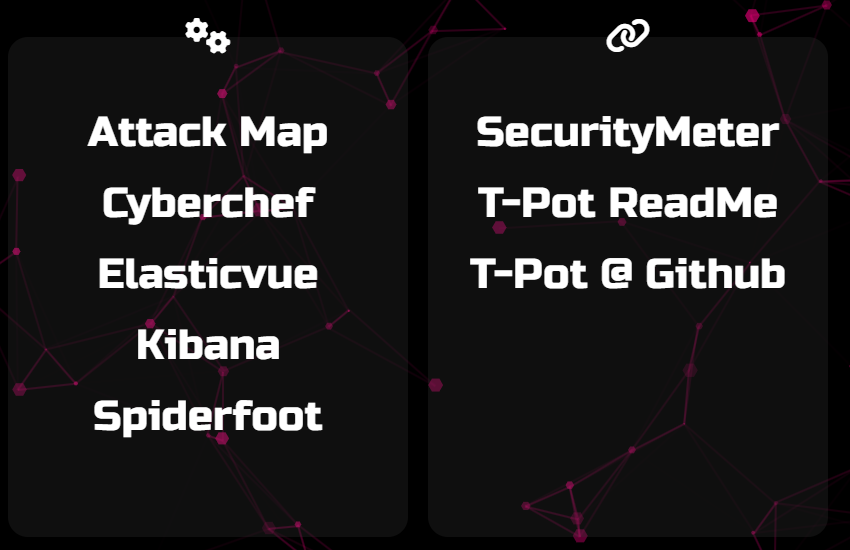
The left hand side is all of the tools at your disposal.
Attack Map – A live and dynamic map showing all incoming attacks.
Cyberchef – A locally hosted copy of Cyberchef.
Elasticvue – A place to perform in-depth queries into the data collected.
Kibana – Full of pre-configured dashboards displaying useful data.
Spiderfoot – A local hosted scanning utility.
Step 6: Configure NAT/Port forwarding
Now that the Honeypots are configured, you need to actually expose them to the internet (scary stuff).
You need to be very careful doing this, as exposing the wrong IP address or Port could leave you vulnerable to real attacks.
To expose the honeypots and start collecting data, you need to use Network Address Translation (NAT) or Port Forwarding rules. This allows the attackers external IP addresses to be able to access your honeypot using your external IP address.
How to do this will depend on the device and will require research if you haven’t done it before, but the rules will follow the below logic with SSH as an example:
Connections from any to port 22, forward to <honeypot IP> port 22Once implemented, log into T-pot and check for incoming data.
Again, this is very dangerous, it is highly recommended that the honeypot is on an isolated network that cannot connect to your other internal assets.